11 May

Sharing Video Recordings

Over the last year we have made a lot of video recordings or ourselves playing.

Smartphones and Tablets have truly incredible cameras. For example, my iPhone 11 can record HD video at 4k and 60 frames per second! This is great if you want to preserve memories or make a summer blockbuster. Unfortunately it often makes files that are too large to send  by eMail.

There are a few workarounds:

  • Record at a lower resolution (iphone only)
    • Go to ‘SETTINGS’
    • Scroll down to ‘CAMERA’
    • Choose ‘RECORD VIDEO’
      • select a lower quality. 720p is often plenty. If you want to make a high-quality video, choose 1080p.
    • You can return to your original settings as soon as you’re done
  • Compress the video after the fact
    • There are a number of Video Compressor apps for both iPhone and android and you should be able to find them fairly easily. These will lower the resolution of the video after the fact so be sure to duplicate your video before trying this for the first time.
  • Use the cloud to share your original video
    • Cloud storage systems such as Dropbox, Google Drive, iCloud, etc. allow you to share very large files. The main limitation is going to be your budget (how much space you need) and how much data you already have stored on the cloud.


03 Nov

Lesson Policy

LESSONS

  • All students must have their own instrument in proper working order, a pencil, notebook and folder.
  • To facilitate remote-lessons, you must have a computer, tablet or smartphone and a reliable internet connection. I strongly recommend against using a smartphone.
  • Parents are welcome to watch all lessons, remote or in-person. Students are welcome to record their lessons.’
  • For In-Home Lessons: a parent or other responsible adult must be present for the entirety of the lesson.


ATTENDANCE:

  • Lessons should begin within 5 minutes of their scheduled time. If you are going to be any more than 5 minutes late for your lesson, please let me know by phone/text (516-234-5299). In the case that a student is more than 10 minutes late without any contact, the lesson may be cancelled and will be treated as a student absence.
  • 24-hour notice is required for all cancellations. Students are responsible to pay for any lessons cancelled within 24-hours (with the exception of medical emergencies). In the case of technical difficulties, we will do our best to reschedule the lesson.
  • In the occurrence of a teacher cancellation we will try to reschedule the lesson. The student will not be expected to pay for any teacher cancellations.
  • In-Home & Studio Lessons may be rescheduled as Remote (Zoom) lessons in cases of  illness, travel, inclement weather or scheduling difficulties


ADDITIONAL COVID HEALTH PROTOCOLS FOR IN-HOME LESSONS

  • In-Home lessons should be taught in a relatively well ventilated area that is not overly trafficked. Additionally high-traffic areas of the home often lead to frequent interruptions.
  • Common use items in the lesson area (music stands, tables, pianos) should be cleaned shortly before the lesson.


ASSIGNMENTS:

  • Assignments for remote-lessons will be posted to a Google Doc and files shared through Google Drive. While a Google account not needed to access these files, it can be quite helpful.
  • Assignments for in-person-lessons will be written in the student’s notebook. While I will provide hard copies of most sheet music and exercise sheets, access to Google Drive is also advisable for the sharing additional files.
  • It is advisable to print out weekly handouts, songs and lesson sheets. If you do not have access to a printer (or want to save paper) make sure that:
    • All handouts, songs and lesson sheets are loaded onto a computer or tablet. Reading off of a smartphone screen is almost impossible.
    • All files should be downloaded and easily accessible. Searching for an eMail link to a google drive link every day is time consuming and makes practice difficult.

BILLING:

  • Lessons will be invoiced at the beginning of each month. If you anticipate any cancellations due to holidays, vacations, etc. please try to let me know by the end of the previous month. If I find out about a cancellation after the invoice has been sent, a credit will be applied to the following month.
  • If you wish to pay week-to-week, payment is due on the day of the lesson.
  • Acceptable payment options include:
    • QuickPay / Zelle: scott@scottkulick.com
    • PayPal: scott@scottkulick.com
    • Check payable to:
      • Scott Kulick
        48-56 44th St. #6G
        Woodside, NY 11377


16 Mar

Collaborative Music Project!

Sign up to Comment on this post. We will use the comments thread to communicate with one another.

A Few Rules of the Road (so to speak):

  1. Listen to what those before you have created. Feel free to offer constructive comments!
  2. Do not erase somebody else’s contribution. Add a new track. If you think something needs to be changed, please let me know and I’ll get to work on it!
  3. Be sure to sign your work. Name your new track with initials (my work will always be SK) followed by a description.
14 Nov

How to Clean Your Trumpet

Over time the inside of your trumpet will get pretty nasty. Your constantly blowing warm, moist air through your horn, then storing it in dark place. That’s not even accounting for all the bits of food that can get stuck in there when you eat and play.

How often should you clean your trumpet? That all depends how often you play. For the average student once or twice a year should be enough. A professional player such as myself will clean my trumpet far more often. Additional cleaning may be necessary if you have a tendency to eat and drink (especially sugary foods) when you play.


Total Time: 45 minutes
Active Time: 15 minutes

Before you start, make sure to pick up a Trumpet Cleaning Kit. You can find it at most music stores, online, etc.

Your kit should include:

  • A Trumpet Snake: along wire with brushes on either end.
  • Valve Casing Brush: A Brush about 1/2″-3/4″ in diameter and a few inches long. Should be about the same diameter as your valves.
  • Mouthpiece Brush: A small, thin brush (thin enough to fit in the shank of your mouthpiece).
  • Polishing Cloth

You’ll also need:

  • Valve Oil
  • Slide Grease

*Oil and grease may be included in your cleaning kit.

Cleaning Procedure:

  1. Gather all of your supplies including:
    • All Brushes
    • 2 Bowls
    • 2 Towels
    • Dish soap (for handwashing dishes, not dishwasher soap)
  2. Fill a sink or bathtub with lukewarm water
    • The sink should be large enough to fit your trumpet
    • Place a towel in the sink (so you don’t dent or scratch your horn)
    • Make sure the water is not too hot (if you put your hand in the sink and say “ooh…that’s hot” it’s too hot). Hot water can strip the lacquer off your horn.
  3. Fill a bowl with lukewarm water & line it with a small towel (or paper towel)
    • This is where you’ll soak any smaller parts.
  4. Disassemble your trumpet:
    • Remove your valves. Remove the top valve caps and finger buttons if you can.
      • Check that each valve has a number (1, 2, 3). If not, pay careful attention to which valve is which. You do not want to mix them up.
      • If you can remove the felts, place them in a dry bowl.
      • Place all metal parts in bowl of water.
    • Remove bottom valve caps, place in bowl of water.
    • First and Second Valve Slides should go in bowl of water.
    • Tuning slide and Third Valve slide can go in either the sink or bowl.
      • You may have to remove a slide-stop screw to remove the third valve slide. Place it in the dry bowl.
    • Place your Mouthpiece in the bowl of water
  5. Let your trumpet soak for 30 minutes
  6. Lay out a dry towel (to dry your trumpet)
  7. Drain the sink
  8. Put soap on the trumpet snake brush. Brush out each slide. Be sure to rinse thoroughly & place on towel to dry.
  9. Snake all pipes of the trumpet.
  10. Put soap on the valve casing brush. Brush out all three casings. Rinse thoroughly and place on towel to dry.
  11. Brush the holes in your valves. Put soap on a paper towel and wipe off the outside of each valve. Rinse thoroughly and place on towel to dry.
  12. Put soap on your mouthpiece brush. Brush out the mouthpiece. Rinse thoroughly and place on towel to dry.
  13. Let all parts dry.
  14. Grease each slide and put the trumpet back together.
    • If you had to remove any screws, be sure to put them back on.
  15. Reassemble your valves. Make sure that you put them in the right place (1st valve in the first casing, etc.). Oil your valves.
  16. Replace the bottom casings and any other parts that remain.
  17. Polish your trumpet and enjoy!


With just a little care your trumpet should last a lifetime!

24 Oct

Intro to Rhythm Guitar: Combo Rhythms

Hopefully you’ve had a chance to read my lesson on Subtractive Strumming. This week we’ll take the next step as Rhythm Guitar Players with Combo Rhythms.

In my four Combo Rhythms, we take the same concepts we learned in Subtractive Strumming and put the notes in a different order. This gives us more variety and an opportunity to read trickier rhythms.

Remember that just as with Subtractive Rhythms:

  • Each of the following rhythms should be played separately. Do not go directly from #1 to #2.
  • These patterns can be played with any chord.
  • Counting and strumming indiciationshave been left out of these four exercises.
    Quarter-Notes should still be played with a downstrum, Eighth-Notes should be strummed down-up.

combo

Be sure to keep your strumming steady and count out loud.

First practice each pattern on a single chord, repeating many times. Once you feel comfortable, add a chord change. Then try applying the rhythm to a song.

Practice these four rhythms for a solid week (or until you feel you’ve mastered them). Spend some time keeping up with your Subtractive Rhythms.

Once you feel you’ve mastered these eight rhythms, look ahead to my lesson on Creating Your Own Rhythms.

10 Oct

Why Learn Music Anyway?

A few months ago I had an interesting exchange with a young student. I asked him a question I’ve asked hundreds of times before “Why do you want to learn the trumpet?”. Usual responses include “I don’t know”, “because my parents say I have to”, “I want to be in the school band”. Rarely I’m treated with “I love the music of Louis Armstrong”.

This one student’s response stopped me in my tracks: “I just want to learn the trumpet to make lots of money, then I’m going to quit”.

Wait, what? How did I miss out on this trumpet player windfall?

As a business, music is cruel. You will never get out of the music business in money what you put into it.


So why learn music in the first place?

Music is universal. Every culture on the planet has created art for our ears. You can’t go anywhere without encountering music. Buskers are on the streets and subways. Music plays in restaurants & stores. We hear it in advertisements. Music enhances the emotional impact of television and movies. Music is everywhere. Religious institutions have been using the power of music to enhance prayer for thousands of years. We listen to music in our cars and wander the streets with headphones on. Music is, simply, everywhere.

We too often answer this question with music’s ancillary benefits: Music helps us learn math, science, etc. Students who study music tend to graduate and go to college. Joining band or orchestra keeps kids out of trouble.


Still, why study music?

  1. Music makes us smarter!

    The human brain is like a muscle in that the more it is used, the stronger it becomes. An engaged mind will become smarter while the disengaged atrophies. With increased interest and understand, every musical can become a mental workout.

  2. Become better consumers!

    Noone wants to listen to bad music, but like a bad burrito many people don’t realize that it was bad music until they don’t feel quite right on the way home. Casual listeners often lack the vocabulary and ears to know what they want. A little bit of education can help us to value music.

  3. Free our society from the social network!

    Music has long been a group activity. Before the 20th century brought us radios, records, tapes, CD’s, mp3s and streaming, you had to go to concerts or make music for yourself. Families could form string quartets, bluegrass bands & choirs just for the joy of making music! While I’m a big fan of keeping our (musical) history alive, I’m more interested in continuing this trend into the 21st century. Make use of live DJ equipment, electric guitars, even internet based collaboration to make music for the sake of making music!


Ultimately we play music because we love it. We love listening to music. We love making music. Those of us fortunately to make a living as musicians didn’t get into this racket for the money.

03 Oct

Starting Points, Ending Points & Beat Displacement

Rhythm is fluid. Start on any beat, end on any beat.
Meter and form impose order over rhythm. It restrains rhythm, controls it. Without these structures in place, our music can become chaotic. This can be fun at times but we want to learn to play well with others.

Working within a musical form, we can manipulate time and free ourselves from formulaic handcuffs by altering our Starting Points and Resolution Points ultimately displacing the beat and moving towards polymeter.


Let’s start with a simple ii V I phrase.

Original


Starting Points

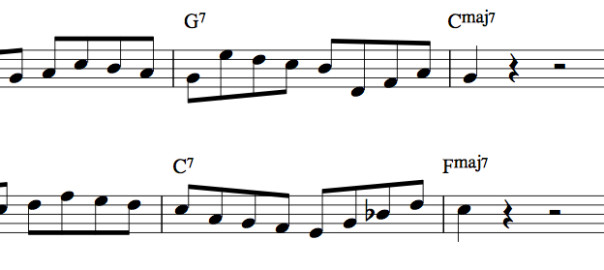
Music can start on any beat. Beginning on beat one is obvious, simple. Effective but predictable. We should create lines which begin on (or off) any beat. Let’s take the previous phrase in its entirety and start it on different beats:

starting pointsBy keeping the lick itself identical but changing the starting point we have displaced the beat.

The first lick no emphasizes beat two courtesy of our starting point, resolution and the ascending 6th in the second bar. The second lick places similar emphasis on beat 4. Also notice how both examples now displace the harmonic emphasis of the line. The first creates a suspension on beat one of measure three. The second lick anticipates both the Gm7 in measure 12 and somewhat less obviously the Fmaj7 in measure 14.

Ending Points

Starting on different beats allowed us to alter the rhythmic and harmonic structure of our phrase without changing our lick one note. Shortening or extending our phrase at different points will put the emphasis on different beats. With very small alterations we can change our resolution point creating all kinds of harmonic variety.

Shortened:

shortenedHere we have shortened each of or our original phrases by removing one beat. In the first lick I’ve also changed the final note to create a more pleasing resolution. Note that we can shorten the first half (ii chord), second half (V chord) or both. Measure 18 emphasizes beat four, measure 22 emphasizes both beats two and four. Both licks now end with an anticipation.

Extended:

extendedWe can extend the lick just the same as we can shorten it: by strategically adding notes. Employ your diatonic and chromatic surrounds, passing and neighbor tones. Again we can extend the phrase at any point. Measure 27 emphasizes beat two, m. 30 beat four and m. 31 beat two. As shortening the licks created harmonic anticipation, extending them creates a suspended resolution.


Putting It All Together:

combinedNone of these devises are exclusive: We can displace our starting point, shorten or extend our phrases. In the first lick above, I have both started the phrase on beat two and shortened the phrase by one beat placing additional emphasis on beat two while returning our resolution to beat one of the third measure.
The second lick starts on beat four, shortens the lick (m. 18 beat 2) and extends the lick (m. 39 beat 1). In m. 37 we emphasize beat four, m. 18 beat two and m. 39 beats two and four.  Resolution has been delayed by a full three beats and the lick sounds very different from the original.


Summary:

Changing our starting and resolution point, shortening or extending the phrase; these are all ways to generate rhythmic variety and add some spice to our playing. Changing the rhythmic emphasis, suspending or anticipating the harmonic changes can help us break down the bar line. Mixing and matching these techniques will help you quickly expand your melodic vocabulary.


Taking It A Step Further:

Take a look at the shortened and extended phrases. When we shorten a four-beat phrase we end up with a three-beat phrase. If we do this repeatedly we end up in 3/4 time.

3 over 4Playing a 3/4 phrase in a 4/4 is polymeter. Two (or more) meters competing with one another is a wonderful way to generate tension and mystery. Just be sure to keep track of where beat one is!

One more thing, extending our four-beat phrase creates a five-beat phrase

Five-Four TimeExtending (or shortening) a phrase can be a great tool for learning to play in less familiar time signatures such as 5/4 & 7/4.


19 Sep

The Anatomy of a Major Scale

What Is A Scale?

In music theory, a scale is any set of musical notes ordered by fundamental frequency or pitch (Wikipedia).

Scales are constructed of intervals. An interval is the harmonic space between two notes. The smallest intervals we regularly deal with are Minor Seconds (half step) or Major Seconds (whole step / two half steps).

The Major scale is the most well known scale. Walk past any practice room and you’ll hear the common pattern: ‘Do Re Mi Fa Sol La Ti Do’. Knowing your major scales is fundamental. Just about every audition or jury will expect you to be able to play them. Having scales under your fingers makes music easier to play (since almost all music is constructed from scales of some sort). Our thinking on improvisation and music theory is often built around using scales.

Let’s look at the C-Major Scale:

majCThis scale is built mostly of major seconds. In fact there are only two minor seconds, between the third & fourth notes and the seventh & eighth notes.

majC

So Let’s Look at Some Other Major Scales:


F-major?

majFThere are those half steps between notes 3-4 and 7-8


G-major?

majGThe half steps are there again.


It’s safe to say that all major scales contain half-steps between notes 3-4 and 7-8 the rest of the intervals are whole-steps.
Alternatively, you can think of the major scale as: Whole-Whole-Half-Whole-Whole-Whole-Half (WWHWWWH).

wwhwwwh

So What Now?

You are going to have to learn (and memorize) all twelve of your major scales. There are two ways to do this. The first is rote memorization: get a book of scales and play them until you can’t forget them. Unless you have a photographic memory that means alot of time spent drilling your scales, leaving you less time to work on music.

Understanding how these scales are constructed (half-steps between notes 3-4 & 7-8 / WWHWWWH), you can build each scale from the ground up: just pick a starting note and go.

At first practice writing all of your major scales. Write a scale play it, then do the same for another. Soon you can throw away the pencil and paper: try figuring out the scale in your head and playing it straightaway.

Be sure to play different scales every day. Don’t be afraid of the less familiar scales (F#, Db, etc).


Bonus:

Write and even improvise music using any major scale.


Do you appreciate these lessons? Considering donating to help keep them coming!
Even better, sign up for a lesson!


12 Sep

Intro to Rhythm Guitar: Subtractive Strumming

Teaching guitar to hundreds of students since 2004.

In music there is nothing more important than rhythm. Appropriately, the Rhythm Guitar Player is fundamental to any band.

Rhythm Guitar provides the harmonic and rhythmic underpinning. A good rhythm guitarist will help the band keep the beat, establish the groove and give us a recognizable chord progression. A good rhythm guitar player is all you need, supporting or even taking the place of a drummer and bass player. On the other hand a bad player will be a real drag on the band.


Subtractive Strumming

Subtractive Strumming is my approach to Rhythm Guitar playing. Before attempting these excercises, be sure you know your rhythm fundamentals (whole notes, half notes, quarter notes & eighth notes). You should also be prepared to play a few chords.

  • Each of the following rhythms should be played separately. Do not go directly from #1 to #2.
  • These patterns can be played with any chord.

subtractive

  1. We start with straight eighth notes. Play these by strumming ‘down-up-down-up-down-up-down-up’ while counting out loud (one and two and . . .)
    • Counting out loud keeps you honest.
    • Keep a steady tempo throughout.
  2. Here we’ve taken away (or ‘subtracted’) the first upstrum on the ‘and of one’. By removing the upstrum, we’ve turned the pair of eighth notes into a quarter note.
    • Make sure your strumming arm keeps moving at the same pace.
    • Don’t forget to count.
  3. Now we remove the first and second upstrums leaving us with two quarter notes and two pairs of eighth notes.
  4. Turning the first three pairs of eighth notes into quarter notes, the only upstrum is on the ‘and of four’.


All four of these rhythms are solid strumming patterns. First practice each pattern on a single chord, repeating many times. Once you feel comfortable, add a chord change. Then try applying the rhythm to a song.

Practice these four rhythms for a solid week (or until you feel you’ve mastered them).